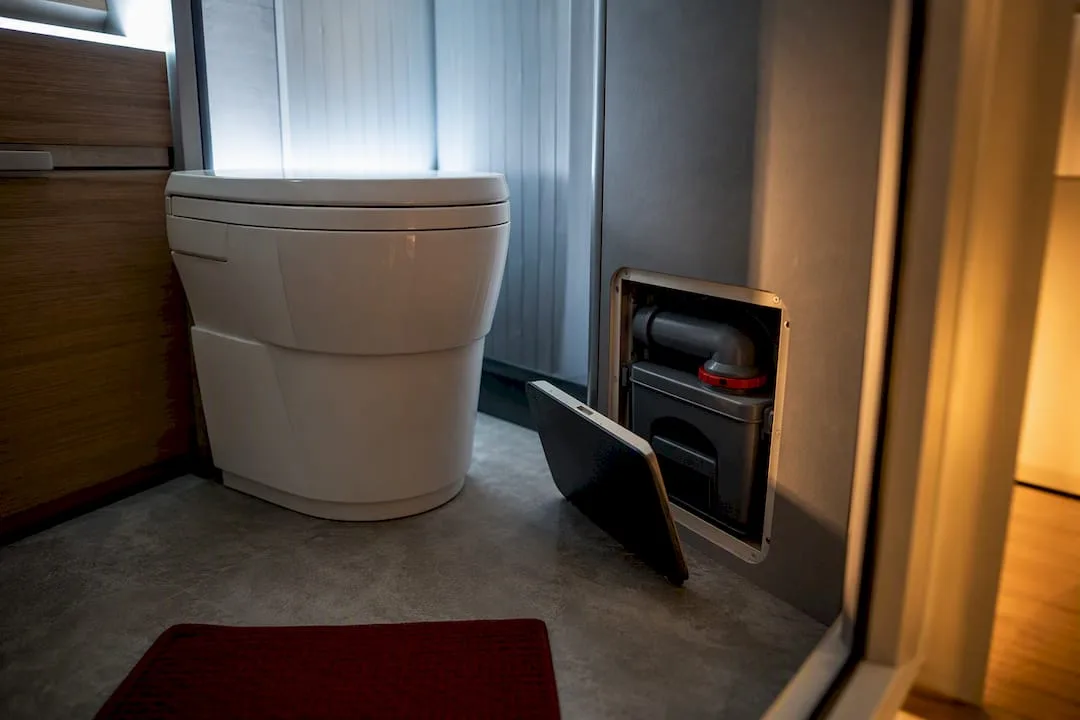
A fixed cassette toilet in a campervan drains waste into a built-in cassette and uses very little water. Right after buying or picking up your vehicle, remember three things: only use paper designed for chemical toilets, close the ball valve after every use, and empty the cassette regularly, not only once it’s full to the brim. Always wear gloves when emptying it, and rinse the cassette thoroughly with water after emptying.
In short:
- The system is simpler than it looks at first glance, relying on a ball valve that opens the path between the bowl and the cassette while keeping water use low.
- For everyday use, it’s important to use the right chemical fluid, flush long enough, and regularly check that the valve is working.
- Foreign objects and wet wipes should never go into the waste cassette — rinse the cassette regularly and top up with fresh fluid to keep it maintained.
- Emptying the cassette is safe when done regularly, according to the instructions, and at suitable locations, in line with sanitation protocols.
- For long-term performance, it’s best to use quality fluids, maintain the valves regularly, and prevent the vent hose from clogging.
Table of Contents
How a fixed cassette toilet works in a campervan
The system is simpler than it looks at first glance. The bowl is fixed to the upper part, while a removable waste cassette sits below it, with a ball valve in between that only opens when you flush.
The valve is the heart of the system. When you press the pedal or button, the valve opens briefly, a small amount of water rinses the bowl, the waste drops into the cassette, and the valve closes again, sealing in the odors. That’s exactly why a fixed cassette toilet in a campervan
uses so little water compared with a home toilet — it’s designed that way from the ground up, which stretches out the time between emptyings even on longer trips.
The cassette sits in an external hatch, usually on the side of the vehicle, and can be pulled out without stepping inside the campervan. That’s a major difference from older or improvised setups, where you had to carry the waste container through the cabin.
The main parts of the system you should know:
- Bowl – the upper part you use, rotatable on most models for easier access to the door.
- Ball valve – opens and closes the path between the bowl and the cassette; the most common source of trouble once the seal wears out.
- Waste cassette – a portable tank with wheels or a handle, whose capacity is usually moderate for several days of use in most campervans.
- Seals – rubber rings that keep odors and liquid from escaping, sensitive to harsh cleaners.
- Fill-level indicator – a sensor or window that warns you when the cassette is nearly full.
Some newer models also have electric flushing at the push of a button and sensors that show the cassette’s fill level as a percentage on the dashboard.
Types of campervan toilets and when to choose a fixed one
Before you settle on a vehicle or extra equipment, it helps to understand that there are
three main types of campervan toilets: fixed cassette, portable chemical, and composting. Each has its place depending on how and where you travel.
- Fixed cassette toilet is permanently built into the bathroom, with the cassette pulled out from the outside. It’s best suited for family trips and longer travel, where comfort matters more than saving space.
- Portable campervan toilet, or portable chemical toilet, is a small, self-contained unit you can move around the cabin. It’s handy in smaller vans or as a backup, but needs more frequent emptying due to its smaller capacity.
- Composting toilet separates solid and liquid waste and needs no chemical additives, which makes it appealing for those heading out on long dry-camping trips without access to service points.
A fixed cassette toilet makes sense if you travel regularly, with a partner or family, and value the comfort of a home-like bathroom routine. Vehicles like the Mercedes V-Class Marco Polo or Ford Transit Nugget Plus already come with this system built in, so you don’t have to think about extra equipment.
How to properly use the campervan toilet every day
Correct daily use is the reason some users never run into problems while others fight odors and clogs every other week. The difference comes down to three or four habits.
- Before first use, add sanitation fluid to the cassette according to the manufacturer’s instructions so waste starts breaking down right away without giving off odor.
- Every time you flush, let the water run long enough to actually rinse the bowl — but don’t overdo it, since that fills the cassette faster than necessary.
- Only use paper labeled as suitable for chemical toilets – regular toilet paper with thicker fibers breaks down poorly in the cassette and can clog the valve.
- Never put wet wipes, sanitary pads, or any foreign objects into the cassette, even if labeled biodegradable. This is the most common cause of ball-valve failure.
- Check the valve once a week – if it squeaks when opening or doesn’t close fully, that’s a sign the seal is worn or needs lubricant.
Pro tip: After every longer stop, open the cassette lid for a few seconds before continuing your journey — this prevents pressure from building up, which can otherwise cause splashing the next time you empty it.
Emptying the cassette: a safe step-by-step process
Emptying isn’t complicated, but nearly every beginner repeats the same few mistakes. Empty the cassette once it’s about two-thirds full, not only once the indicator turns red — that way you avoid overloading the valve.
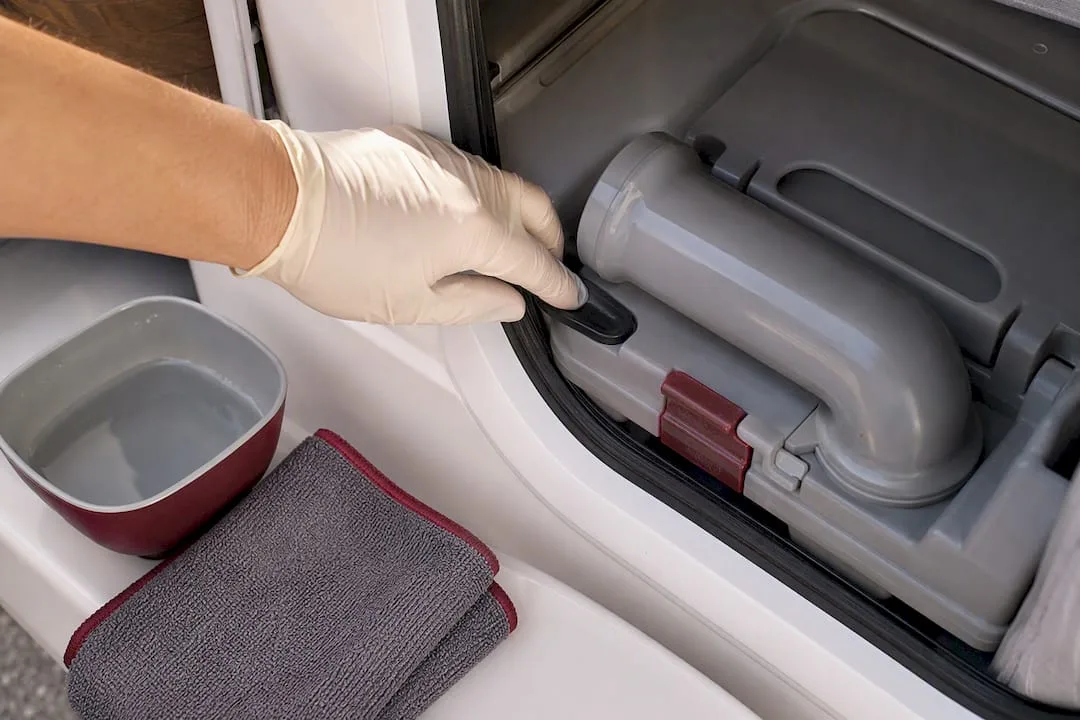
- Put on gloves, and protective clothing if possible, since this involves direct contact with wastewater.
- Find a suitable service point – in Slovenia these are marked toilets at campsites, campervan stopovers, and some petrol stations. Check this overview of campervan stopovers in Slovenia to find the nearest location before you set off.
- Pull out the cassette from the outside compartment, carry it to the disposal point, and open the pour-out valve at the bottom of the cassette.
- Pour slowly and evenly to avoid splashing, tilting the cassette at the angle recommended by the manufacturer.
- Rinse the cassette with clean water through the flush port if the model has one, or through the main opening if not.
- Add a fresh dose of sanitation fluid and water before putting the cassette back in place.
How often you need to empty it depends on the number of users and the cassette’s capacity. For a family of four with a standard cassette, that usually means emptying it several times a week. To find suitable dumping locations along the way, you can use
online maps of service points, which is especially handy on lesser-known routes through the
Balkans or the Alps.
Cleaning and maintenance: which products to use and how often
Regular maintenance is what separates a toilet that runs flawlessly for five years from one that’s already leaking or smelling after just one. Two things matter most: the right sanitation fluid and rinsing it often enough.
- Sanitation fluid for the cassette breaks down waste and controls odor. An established product on the market is Thetford Aqua Kem Blue, which the manufacturer recommends specifically for breaking down waste and controlling odor in fixed cassette systems.
- Bowl rinse fluid (usually pink or green) prevents residue from sticking to the walls and keeps rubber seals supple.
- Avoid bleach, vinegar, or harsh homemade cleaners – these corrode rubber seals and can damage fill-level sensors.
Thoroughly rinsing the cassette after every emptying is, per manufacturer recommendations, one of the most important steps for extending seal life. In practice, that means rinsing the cassette with clean water after every emptying until the water running out is clear.
Recommended maintenance routine:
Inspect the seals roughly once a month during the season, and have the valve and flush mechanism checked by a professional once a year, ideally before the season starts. Rinsing regularly after every emptying directly reduces seal wear and the need for unplanned repairs on the road.
Preventing odors and troubleshooting common problems
An unpleasant smell from the toilet almost always means one of three things: empty or under-concentrated sanitation fluid, a worn valve seal, or a blocked cassette vent.
- Check the level and concentration of the sanitation fluid – if it’s diluted or several weeks old, it loses its breakdown effect and the smell comes back.
- Inspect the ball valve – bits of paper or solid particles on the seal stop it from closing fully, letting odor into the cabin.
- Check the cassette’s vent hose, which needs to stay clear – a blockage builds up pressure and lets odors escape through the bowl instead of through the outside vent.
- After any long period the vehicle sits unused, rinse the cassette and add fresh fluid, even if it wasn’t in use.
If the smell doesn’t go away after these steps, or you notice liquid leaking around the cassette, it’s most likely a worn seal or damaged valve — a job for a service center. When you call a technician, describe exactly when the smell shows up (during use, while driving, or when parked) and whether you’ve noticed any dripping — that speeds up diagnosis considerably.
Pro tip: If you only notice the smell after the vehicle has sat unused for a few days, check the roof or side vent hose first — that’s where leaves or dirt most often collect and block airflow.

Where to buy sanitation fluids, paper and spare parts in Slovenia
Slovenian camping-gear shops carry everything you need to keep the system running smoothly. Look for these product categories:
- Chemical toilet sanitation fluids – available from specialized camping-gear retailers, which offer both breakdown fluids and rinse agents.
- Toilet paper for chemical toilets – biodegradable paper that doesn’t strain the valve and seals.
- Spare seals and valve parts – worth ordering ahead, since you won’t find them in every shop, only from specialized dealers or brand importers.
- Portable toilets and extra equipment – handy as a backup, also available through online camping-gear stores.
When buying, always check that the product is explicitly meant for chemical or cassette toilets, not just general bathroom cleaning — some universal cleaners aren’t compatible with the rubber seals in these systems.
Campervan.si experience: what we check before every rental
At Campervan.si, before every handover we check that the cassette is completely emptied and rinsed, that the valve moves without sticking, and that there’s a fresh dose of sanitation fluid in the tank. From renters, we only expect basic care during the trip: using the right paper and emptying it regularly — we take care of the rest.
For easier trip planning, check out our guide to
camping equipment, which also includes tips on extra sanitation supplies for longer trips.
Why it’s worth investing time in understanding the system
The fixed toilet is one of those things nobody thinks about — until it fails halfway through the trip, with no signal and nowhere near a shop. Conventional advice usually stops at “empty and clean it regularly,” which is true but too vague to actually help in the moment when the valve is sticking or the smell becomes unbearable.
From experience renting out campervans, it’s clear that most problems come from using the wrong paper and not rinsing often enough, not from a lack of understanding of the mechanism itself. People focus too much on which sanitation fluid to buy and not enough on the basic discipline of emptying and rinsing after every visit to a service point.
If you take away one thing from this article, let it be this: a fixed cassette toilet in a campervan doesn’t need complicated maintenance, it needs consistency. One week of delayed emptying or using the wrong paper can cause a week of discomfort on holiday. Invest five minutes a day, not five hours once a season.
— Rok
Renting a campervan with a fixed toilet without worrying about hygiene
Campervan.si is an alternative to searching for a used campervan with an uncertain toilet. Instead of risking a broken valve or a smelly cassette left over from a previous owner, you take over a vehicle where all of this has already been checked and prepared.

Our models, the
Mercedes V-Class Marco Polo and
Ford Transit Nugget Plus, have a built-in fixed cassette toilet, an emptied cassette, and a fresh dose of sanitation fluid at every handover. You don’t need to buy equipment or check that your cleaning products are compatible — we take care of all of that in advance. Your job is simply to use it correctly along the way, which after reading this guide is now a lot easier.
If you’re planning a trip through Slovenia, the Alps, or the Balkans,
check available rental dates and book a vehicle that won’t leave your hygiene to chance.
Sources
To put this guide together, we drew on manufacturer instructions from Thetford on sanitation fluids, a comparative overview of toilet types from Razloženo.com, and the product range of Slovenian retailers such as
Nazraku.
Recommended